8080 MkI running NOP's
Homebrew 8080 Computer
[ Home ] [ Schematics ] [ Pictures ] [ 8088 Computer ] [ MIDI ] [ Z80SBC ] [ Pong ] [ Downloads ] [ Links ] [ Contact ]
Other Stuff:
555 Contest Entry
CADET single board discrete processor
Arduino SID Shield
Apple II Colour Demodulator
Floppy Disk Audio Sampler
Arduino DSP Filter for PWM output
Display any video on an oscilloscope
A Tube VCO using Theremin techniques
8-bit SPI Video for ATmegas
I started these 8080 based computers (8080 Mk I and II) about a year ago after finding some odd boards at an electronics junk shop here in Adelaide. I ended up with three CPU boards (with two 8080's each) and a few peripheral boards. They were a steal at $1 each. The oldest 8080 of the lot was an Intel C8080A-1 dated late 1975 - a very old chip indeed. Amazingly all of the 8080's and associated peripheral chips still work.
Here it is running Zork I from a very slow floppy drive
And again playing Still Alive
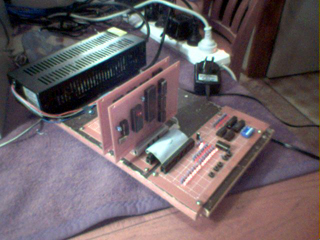
All of the boards of the 8080's were created with 'point-to-point' wiring using wirewrap wire. Using wirewrap this way tends to get very messy and often causes bridged connections. Pictured below is the 8080 Mk I computer I created to put one of the 8080's to use. This system is simpler than the Mk II but worked very well for a second attempt at a homebuilt computer. Nothing beats the thrill of seeing one of these churn out "Hello World!" for the first time (or maybe I should get out more...).
8080 MkI running NOP's
The 8080 Mk 2 system is a big improvement over the original design. I tried to keep it close to the Eurocard standard by using DIN 41612 connectors rather than the 50 pin IDC headers, and used 100x150mm prototype cards. This gave me more signal lines so the 8080 Mk II has support for vectored interrupts and DMA control. The interrupt controller is an Intel 8214 with an 8212, layed out as showen in the 8080 Users Guide. The DMA controller is an 8237, the same as the IBM PC.
Last updated 2014/01/20